CSS Editing Option: Stylizer |

|

|

|
|
CSS Editing Option: Stylizer |

|

|

|
|
|
||
If you don't have someone available that can edit the style sheet (CSS) for your site directly, another option is to use a third party utility called Stylizer. This inexpensive tool makes CSS editing much simpler, and can be done remotely. The tool copies the CSS file to your local machine and provides a WYSIWYG editing interface. Once changes have been made, this updated CSS file can be replaced on your web server or sent to an Ad Astra technician to replace in your cloud hosting environment.
![]() NOTE: If you are a cloud customer, the CSS files are not directly accessible. Therefore, using a tool such as Stylizer is the recommended way to edit the style of your site in this case.
NOTE: If you are a cloud customer, the CSS files are not directly accessible. Therefore, using a tool such as Stylizer is the recommended way to edit the style of your site in this case.
From the Stylizer website:
Stylizer sports a unique grid-like CSS editing interface that feeds your style sheet to an integrated browser of your choice, all in real time. Drag page elements around and adjust all your colors from the comfort of your editor, all in real-time.
Stylizer is packaged with a range of handy tools that just don't exist elsewhere. It automates things like Image Replacement, CSS positioning, clear fixes, CSS hacks (if you need them) and more.
Instead of loading CSS files directly, Stylizer just asks for a URL of the page you want to change. Then when all is said and done, the CSS is saved right back to where it came from via FTP, SFTP, or a network share.
More information is available at http://www.stylizerapp.com.
Once Stylizer has been purchased and installed, Ad Astra recommends the following process for editing the application CSS:
1.Launch the Stylizer application.
2.Enter the URL for the Astra application website into the URL field and press Enter.

The site will appear in Stylizer, ready to be customized.
3.Click on each of the CSS files in the upper right hand corner that have a “Cleanser” icon next to them and then click Review Warnings to resolve any warnings provided (do the same for any that have errors as well).


4.Correct any warnings by clicking Continue.

5.Make all desired style changes to the site in Stylizer.
![]() NOTE: In order to add any images to the site, the image will need to be uploaded to the images folder on the application server before it can be added to the site and customized.
NOTE: In order to add any images to the site, the image will need to be uploaded to the images folder on the application server before it can be added to the site and customized.
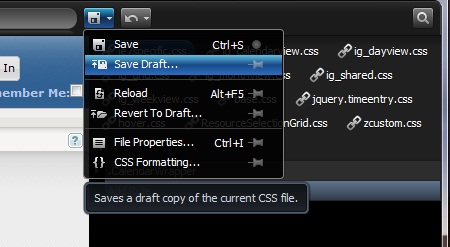
6.When finished editing, save the CSS file (as a draft) to your local computer. Saving as a draft will allow the user to reload the “draft” again for further customizations if they are needed.

![]() NOTE: If you do not save the CSS file as a draft, you will NOT be able to reload it into the Stylizer once the program has been closed out. This file will need to be uploaded to the server and published to the live site before you can continue making changes to the site. When you do not save the file as a draft there will be a prompt notifying you that this will not be saved to the location where it originated.
NOTE: If you do not save the CSS file as a draft, you will NOT be able to reload it into the Stylizer once the program has been closed out. This file will need to be uploaded to the server and published to the live site before you can continue making changes to the site. When you do not save the file as a draft there will be a prompt notifying you that this will not be saved to the location where it originated.

7.If your site is hosted in the cloud, you must provide a copy of the custom CSS files to an Ad Astra support agent for publishing to your cloud environment.
Otherwise, you will need to update the live CSS files for the site on your web server.